Adjustable Cable Clutch Installation for T-5 Upgrades: 65-66 Mustangs
| Retrofitting to a Cable Clutch for under $80. |
There are several different (and very good) approaches out there on the net regarding adapting a cable clutch to replace the old Z bar setup on a Early Model. These include:
There are also several very nice kits on the market from various businesses: Some of these are:
| Ron Morris Performance |
| Mustangs Plus |
| Modern Driveline |
| ...anyone else?..lemmie know and I'll add |
The above is provided so that you can get a feel for all the variations out there. Most use the same basic concept, except Steve's...which is an adaptation of the late model quadrant approach.
Because I was unsure of the distances, It was important to me to use a firewall cable adjuster in conjunction with an aftermarket adjustable cable.
| Parts List: | Steeda Adjustable Clutch Cable | Thunder Racing | $45.00 |
| Firewall Clutch Adjuster | Madhatter Racing * | $25.56 | |
| 1 1/4" Steel Pipe Mounting base | Ace Hardware | $2.39 | |
| Salvage Brake Pedal | - - | ||
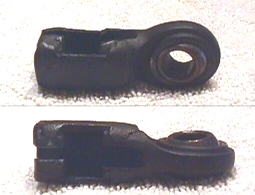
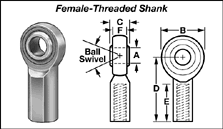
| 3/8" Ball Joint Rod End P/N 60645K34 | McMaster | $3.67 | |
| 1.5"x3"x1/8"Plate (Inside brace plate) | Scrap Iron | - - | |
| 3"x3"x1/8" Steel Plate (Firewall Mount) | Scrap Iron | - - | |
| Miscellaneous bolts, washers, screws | - - | ||
| Total: | $76.62 | ||
|
* On the Madhatter Racing site, go to Mustangs - Parts Lookup (Drivetrain) - Parts (Quadrant) |
|||
| Assembling the pedal extension and pivot. The extension welded to the pedal is a partial section of another pedal. Very simple idea. If you were to take your manual brake pedal and flip it upside down, it would have this basic bend. A little more bending on the pedal end would put it in place. On the end is a 3/8" bolt welded (in my case) 2.90" CL to CL with the clutch pedal pivot rod. The objective is to bring the cable attach point in between 2.75" and 3" over the pivot, and centered over the master cylinder. | 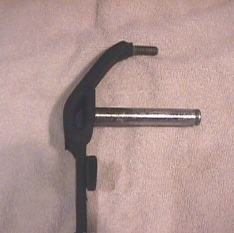 |
||
 |
Here you can see the
modified pedal installed in the bracket. Just behind the
bolt is the hole in the firewall. Although blocked
from view by the wiper rod, the upper bolt easily clears the cowl,
and still retains 1/16" clearance when the ball end is
attached.
Check out Steve's welding job....not bad..huh.. |
||
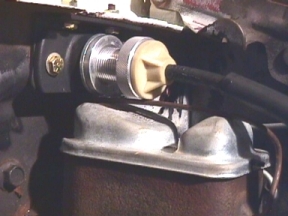
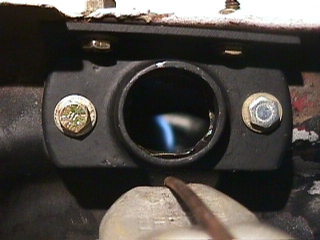
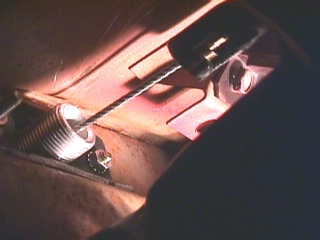
| Mounting the Billet Adjuster: To mount the cable adjuster I got from MadHatter Racing to the firewall, I needed something that would make the cable adjuster stand off the firewall. At the hardware store, I found a 1 1/4" pipe flange, which is used to mount pipe to a flat surface, such as if you were making a handrail. I cut off two sides and enlarged the hole so that it would let the adjuster fit snugly. This turned out to be a very nice looking part, but is a very hard piece of steel, and took a lot of cutting and filing to enlarge the hole. Welding this out of plate and pipe would probably take less time, and buying one already made by Glen would be even easier. |
|
||
|
Cable Attachment |
Here you can see how the ball joint rod end (also known as a "Heim Joint" is used to attach the cable to the pedal. The rod end was cut, slotted, and a strap welded around to extend the cradle. The hat shaped end of cable slips in and rests against the bottom inner shoulder (see photo below) |
||
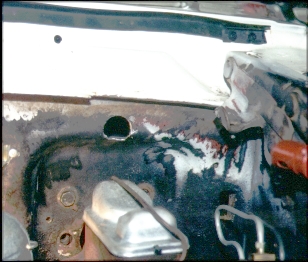
| Firewall Attachment: The photo to the left shows the hole needed to allow the billet adjuster to be fully inserted through the firewall while still clearing the cowl inside. To mount the pipe flange, something is needed to reinforce the firewall and distribute the load. A piece of 3" wide steel was bent to fit the underside of the underhood strut brace flange. This is located directly over the brake master cylinder. It was notched to clear the 1 1/16" hole drilled in the firewall. (Excuse the mismatched fasteners...they were for temp install) | |||
 |
 |
||
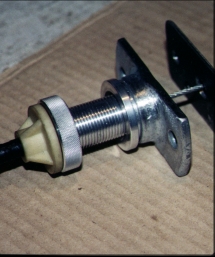
| Assembly: Not much to it...the Steeda cable comes with a rubber mount on the firewall end that pulls off. Underneath is a composite housing that will fit into the firewall adjuster. There are 4 small ears on the composite housing that need to be shaved off in order for it to slip in the billet adjuster. It slips in snuggly to the adjuster. The cable feeds through and mounts to the ball joint, which is secured to the pedal by a 3/8" nut. | |||
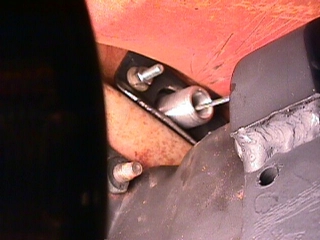 |
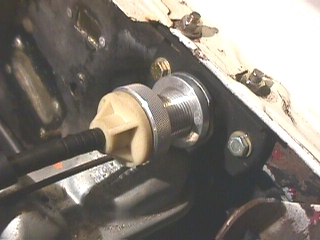
Because the hole drilled in the firewall was in the radius of the bend for the setback of the master cylinder, I felt an inner bracket would help with load distribution. This photo shows the 1/8" x 3" x 1.5" inner bracket. It is bent to fit the curve of the radius and slips up slightly between the firewall and the cowl. The adjuster can be seen in fully inserted. | ||
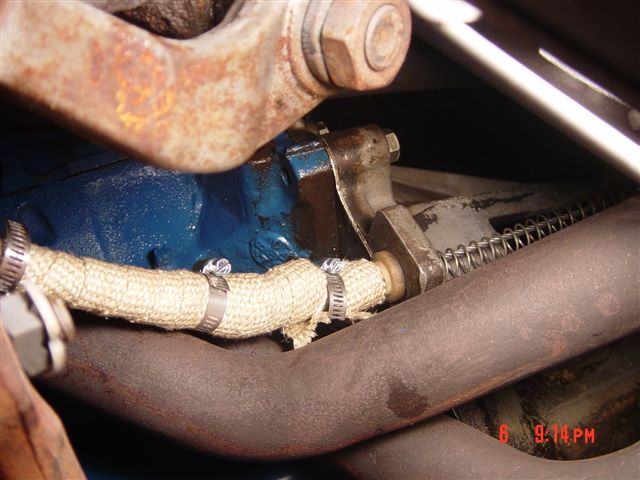
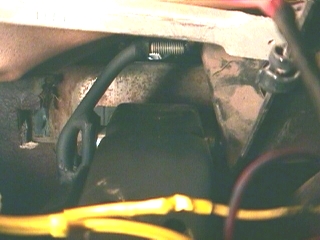
Here is how I wrapped the final 8" or so of cable to provide protection from the header tube. This is standard header wrap cloth.
Lesson's learned from this project are that the cable clutch needs to be of a length that 1) doesn't have hard bends in it and 2) that it runs in an area far enough away from the exhaust or headers to avoid damage. My first attempt uses the Steeda cable, but this is really too long in it's basic length. It needs to be modified to shorten it so that it can run just inside the shock tower, down next to the master cylinder plumbing, and subsequently into the bell housing. This is the optimum route.