|
Smooth
Windows |
||
|
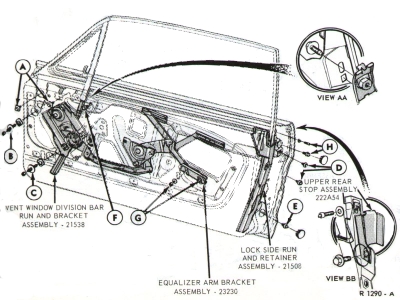
1. Typical Window roller mechanism, as shown in the '66 Mustang Shop Manual.
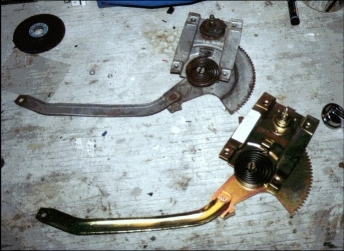
2. Removed L/H regulator assembly above, and reproduction replacement unit, below.
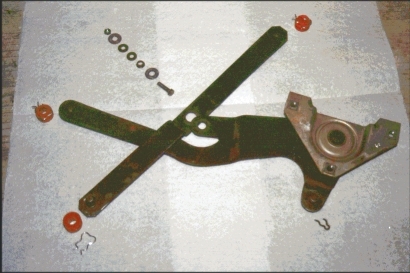
3. L/H Scissor Assembly, disassembled with all parts.
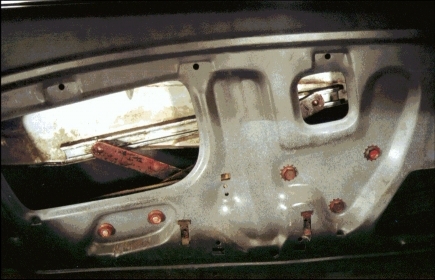
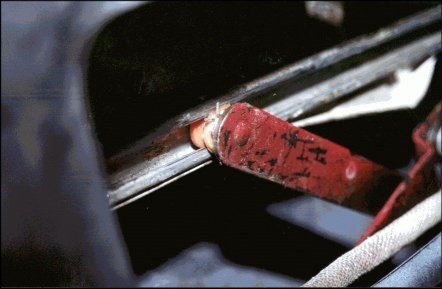
4. Window lowered slightly (approx 2") to show scissor rollers in their track.
5. Close-up of the the roller in the track. Note the steel clip that holds the roller to the stud on the Scissor. MustangSteve's Message Board Suggestions:
|
Since
I've had my 65, the windows have never worked smooth. Whenever I
wanted to raise or lower them, I had to kinda stand there in the open
door and hold onto the top of the trim piece and 'help' the glass up or
down while turning the crank.
(sound
familiar?) That wasn't much of
a problem this summer because I never ran the A/C...I like to cruise
around with
the windows down. But, I was driving home in the rain the other
night, I couldn't sit in the driver's seat and crank up the passenger
side
(I know.. wimp),
and while trying to roll the driver's window up, the glass sort of
crawled up the front track and didn't the back, so the vent & window
kinda looked like that first big hill of the Judge Roy Scream roller
coaster.
I figured it was time to get in there and fix things. So, here are a few things I learned gutting and reworking the window regulator mechanisms: How it works: There are two basic elements of the window mechanism....the regulator, and the scissor assembly. The regulator is the crank mechanism used to drive the pivot on the scissor assembly. The scissors is the second portion that has the triangle shaped bracket that bolts to the door and has the 3 little wheels that ride in the tracks that drive the window up and down. When you turn the handle, 1) the crank turns the shaft 2) which has a gear on the back 3) which engages with the big half circle gear 4) which moves the bar along the bottom 5) which pins to the scissor bracket 6) which pushes the main scissor arm upward 7) which spreads the scissor arms 8) which drive the wheels 9) which sit in the wheel tracks 10) which are tied to the window 11) which makes the window move up or down. (whew....did'cha ever play Mousetrap when you were a kid?) Removal: Door handles and window cranks are either clip on or screw on, depending on the year. The door panels are removed by prying the 15 clips that surround each door panel from the door shell itself. These spring clips must be handles carefully, as they can tear out of the cardboard door panels. To pry the clips out of their holes, I used my Ball Joint Pickle Fork, with the tangs covered with black electrical tape. (Sounds hokey, but it worked very well and didn't scratch the paint.) Note: Before unbolting the regulator or scissors, clamp the window in the up position. This will hold it out of the way and allow you to get your arms into the door shell. The left and right hand units differed slightly in their removal. The regulator and scissors on the left unit (driver's) can be removed as a combined unit, by removing the seven screws, slipping the rollers from the tracks and pulling the unit from the large hole in the rear of the door. The right hand side didn't come out so easily, so the retaining clip was pulled from the scissor fulcrum (see the photo at left) and the regulator actuator arm was disconnected. The scissors can be removed easily, but the regulator assy had to be pushed forward and around the vent window track run, then pulled out the back. Repairing the Components: I didn't rebuild the regulator. I purchased reproduction units (shown above) from Texas Mustang Parts. Since the existing units were OEM parts, I may try to fix them for next time. The scissor units can be bought as reproduction items, but after removing and examining, I chose to rebuild the existing items. Right hand unit's pivot rivets were ok, so all that one needed was rollers. The left hand unit needed the center pivot replaced, which was accomplished with a set of small and large washers and a locking nut/bolt combo. Rollers were also needed. Notice the lone clip in the lower right of Photo #3. This clip pins the regulator arm to the scissor assy. If this pin breaks or comes loose, the window will not operate. The little orange rollers are the key element in this rebuild. They are less than $1 each and there are 3 in each door. They have a small metal clip that secures them to the pins on the end of the scissors. The reason my window was not working was because these rollers had in some cases seized up, and other deteriorated so that the scissor arm wasn't driving the window. These are a MUST REPLACE. Grease everything as you reassemble. ReInstallation: The driver's door was a straightforward reverse of the removal. The regulator and scissor assy were pinned together, folded up, inserted into the rear hold of the door, unfolded, and moved into place. regulator was loosely screwed into place, the lower roller was inserted into the lower track, and the scissor pivot was screwed down. Then the regulator was tightened down. Now comes the secret. Do not put the rollers on the upper arms of the scissors. Instead, lower the window slightly (2" or so) and secure in place with a clamp. Then insert the rollers into the tracks. Crank the regulator up or down until the pins of the scissor arms line up with the tracks, then slip the rollers into place and PUSH THE PINS INTO THE ROLLERS. They will snap into place with the retaining clip hitting the slot in the back of the pin. This is much easier than trying to fish the rollers into the tracks, then screwing in the pivot and regulator. The passenger's side door wasn't quite so easy. The regulator had to be fished in around the back side of the vent window track then moved into place. The scissors were inserted, and the two units pinned together. Then the two units were screwed down and the same method used to locate the rollers. Comments? Email me! |
|